
Once the email is ready, you can export it — that is, save it in the format you need to transfer it to another system.
Where to find Export
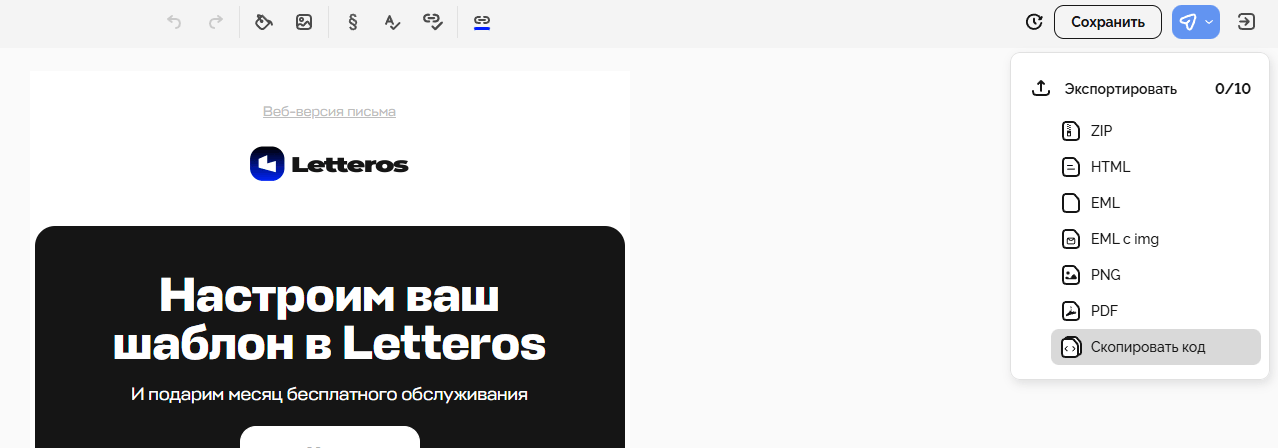
Export is available in the editor, in the top right corner. Click the blue button with the arrow — a menu will open with export options and an export counter (for example, 0/10).

The screenshot below shows the available formats: ZIP, HTML, EML, EML with images, PNG, PDF, and a button to copy the code.
How to export an email
1. Make sure the email is ready and saved.
2. Click "Export" (the blue button in the top right).
3. Select the format you need.
4. Choose the settings you want in the export options.
4. Click the "Export" button, check the result, or upload the email to your sending platform.
Export settings
After clicking the "Export" button, a window with additional options opens in the editor.
Here you can set the technical parameters of the email before exporting — from the name and subject line to analytics and code-processing options.

Email settings
• Email name — shown only inside the project, helps you find the right template faster.
• Subject line — the headline the recipient will see. We recommend keeping it under 65 characters so it displays correctly in all email clients.
• Preheader — a short piece of text that appears next to the subject line. Use a concise and catchy phrase.
• HTML snippet before </body> — a field for adding service elements, such as open-tracking pixels or custom variables.
• Background and width — define the email's appearance. The optimal width is 600 px. You can also set a background image for the entire template.
Export settings
• Link wrapper — used if your ESP requires a special link format (for example, in Mindbox or Sendsay).
• Compress code — minifies the HTML to reduce the email's file size.
• Disable subject in <title> — useful if your system adds the email subject automatically.
• Don't truncate the preheader — keeps the full entered text without shortening it.
• Enable UTM tags — adds click-tracking parameters (utm_source, utm_medium, utm_campaign, etc.).
• Disable Outlook optimization — use this if the email displays incorrectly specifically in Outlook.
Analytics
In this block you can connect your own analytics to track engagement.
The "Engagement threshold" parameter helps determine how much time a recipient needs to spend in the email to be considered "engaged".
Export formats and where they're used
HTML — the main option for uploading to your ESP (Unisender, Sendsay, Mindbox, etc.). Contains the email code with external links to images.
ZIP — HTML plus a folder with assets. Suitable if the platform requires local images.
EML — an email file for testing in email clients (Outlook, Apple Mail, etc.).
EML with img — the same, but with embedded images. Handy for offline viewing.
PNG — exports the email as an image, convenient for approving the layout.
PDF — a version of the email for printing or internal approval.
Copy code — instantly copies the HTML code to your clipboard if you need to paste the email manually into another system.
What to check before exporting
Before exporting the email, make sure that:
— the subject line and preheader are filled in.

— all links work and lead to the correct pages.
— the necessary tags are added: "web version" / "unsubscribe".
— all images have alt text.

— the email displays correctly in both desktop and mobile mode.
The preview mode is located at the bottom of the editor, where you can switch between views:
Desktop: the standard view of the email on a computer screen.
Mobile M: the mobile view of the email.

Export via integrations
If your account is connected to one of the mailing platforms, you can export the template directly to your ESP via API — without downloading files.
Letteros supports integrations with Unisender, Mailganer, Sendsay, and other services. To export in one click:
1. Connect the service you need in the "Integrations" section of your account.
2. Return to the email editor.
3. Click "Export" → "Export to platform".
The template will automatically appear in your mailing account, where you can immediately test and send the email.

Compatibility notes
After exporting the email, it's important to consider the specifics of different email service providers (ESPs).
Although Letteros strives for maximum compatibility, individual systems may interpret the HTML code differently.
What to know before importing the email into your ESP:
• CSS support may vary. Some ESPs (e.g. Mindbox, SendPulse) don't recognize some inline styles, which can change spacing or button sizes.
• Fonts may be replaced. If the chosen font isn't supported by the system, it will be replaced with a default one (usually Arial).
• Images must be accessible via a link. If you export the email as HTML, make sure the images load from an accessible domain.
• Testing before sending is mandatory. After uploading the email to your ESP, send a test to yourself and check how it displays on different devices and email clients (Gmail, Outlook, Mail.ru, etc.).
• Make sure the email includes an unsubscribe link. Most platforms won't allow sending without one.
Useful information
1. What is a preheader and why is it needed?
A preheader is a short piece of text that appears next to the subject line in the email client. It helps the recipient understand what the email is about before opening it.
2. Alt text for images
Alt (alternative text) is a caption that displays if an image fails to load for some reason. It also helps email clients and screen readers for visually impaired users understand what's depicted.
3. Email responsiveness
Responsive design for different devices ensures the email looks correct on both a computer and a smartphone.
If the email isn't responsive, the text may "shift" on a phone and buttons can become hard to tap.
4. Why you need a web version of the email
The web version is a link to an online page with your email. If the email doesn't display correctly in the email client, the recipient can open it directly in a browser.
5. Unsubscribe link
By law, every marketing email must include an unsubscribe link. It lets the recipient safely opt out of emails and helps prevent spam complaints.
6. CTA (Call to Action)
A CTA is a call to action, most often in the form of a button ("Buy", "Learn more", "Get a discount"). It's the key element that guides the user to the next step.
Next section — Connecting CDP and ESP platform integrations in Letteros